Shipping your parcel to customers
There are several delivery partners for e-commerce in the Philippines that you can use to deliver your products. Some of the popular ones include:
- LBC Express – LBC is one of the largest courier and logistics companies in the Philippines, offering both domestic and international shipping services.
- J&T Express – J&T is a courier and logistics company that offers door-to-door delivery services within the Philippines.
- Ninja Van – Ninja Van is a technology-enabled logistics company that provides last-mile delivery services for e-commerce businesses in the Philippines.
- GrabExpress – Grab is a ride-hailing company that also offers delivery services through its GrabExpress platform. It is available in major cities in the Philippines.
- Shopee Express – Shopee is an e-commerce platform that offers its own delivery service, Shopee Express, for its sellers. It is available in select areas in the Philippines.
- Lazada Express – Lazada is another e-commerce platform that offers its own delivery service, Lazada Express, for its sellers. It is available in select areas in the Philippines.
These are just a few of the many delivery partners available in the Philippines. You may want to consider factors such as delivery time, cost, and coverage area when choosing a delivery partner for your e-commerce business.
Adding Payment Method like G-Cash on your e-commerce store
There are a lot of ways on how e-commerce store owners accept payments online. This can be in the form of cash (COD), debit card, credit card, or by using any online payment platforms like Paypal. Gcash is also one of the payment platforms that most of the customers use specially here in the Philippines.
Adding GCash as a payment method to your e-commerce store in the Philippines can be done by following these steps:
- Create a GCash account – Before you can integrate GCash as a payment method on your e-commerce store, you will need to create a GCash account.
- Sign up for a payment gateway – A payment gateway is a service that processes payments from your customers. You will need to sign up for a payment gateway that supports GCash payments. Some popular payment gateways in the Philippines that support GCash include Dragonpay and PayMongo.
- Integrate the payment gateway into your e-commerce store – Once you have signed up for a payment gateway, you will need to integrate it into your e-commerce store. This can usually be done by installing a plugin or extension that is provided by the payment gateway.
- Enable GCash as a payment option – After you have integrated the payment gateway into your e-commerce store, you will need to enable GCash as a payment option. This can usually be done by going to the payment settings in your e-commerce platform and selecting GCash as a payment method.
- Test the payment process – Before you start accepting GCash payments from your customers, it is important to test the payment process to ensure that everything is working correctly. You can do this by placing a test order on your e-commerce store and using a GCash account to make the payment.
By following these steps, you can add GCash as a payment method to your e-commerce store in the Philippines and offer your customers a convenient and secure way to pay for their purchases.
Paymongo Payment Gateway Step by Step Process to accept G-cash Payments
5 New Easy Steps to Add GCash as Payment Option for your E-Commerce Store
1. Create a PayMongo account
PayMongo allows us to accept online payments using debit cards, credit cards, and GCash. To create an account, go to PayMongo’s website https://paymongo.com and then click the Get started for free button.
Fill out all the needed fields, accept terms and conditions, and click Create Account.


After successfully creating an account, here are your next steps to get started with PayMongo:
- Confirm your email address by clicking the link in the email sent to you
- Submit your business documents in the Dashboard for account activation (upon submission of documents, please allow 7 working days for our team to process them)
2. Fill-out all the need information of you and your business / e-commerce store.
You need to fill out your personal information, business information, bank account details. They will only ask for your basic information. After giving all the information needed, sign the Statement of Acceptance and then click the submit all the requirements button.

After that, you will need to wait for at least 24 hours for PayMongo to review your business details. Once approved, they will send you another e-mail that you may now start accepting payments.
3. Install Payments via PayMongo for WooCommerce plugin
This step is for E-Commerce store built using WordPress. If you want to convert your Shopify store into a WordPress WooCommerce store, Contact me orClick this link.
- Login to your WordPress website by going to http://yourstoredomain.com/wp-admin and go to Plugins tab.
- In the plugins page, click the Add New button and search for Payments via PayMongo for WooCommerce plugin. Click Install and then click Activate. In my case, it is already active:

3. Go to WooCommerce tab and click Settings

4. Set-up the PayMongo payments option
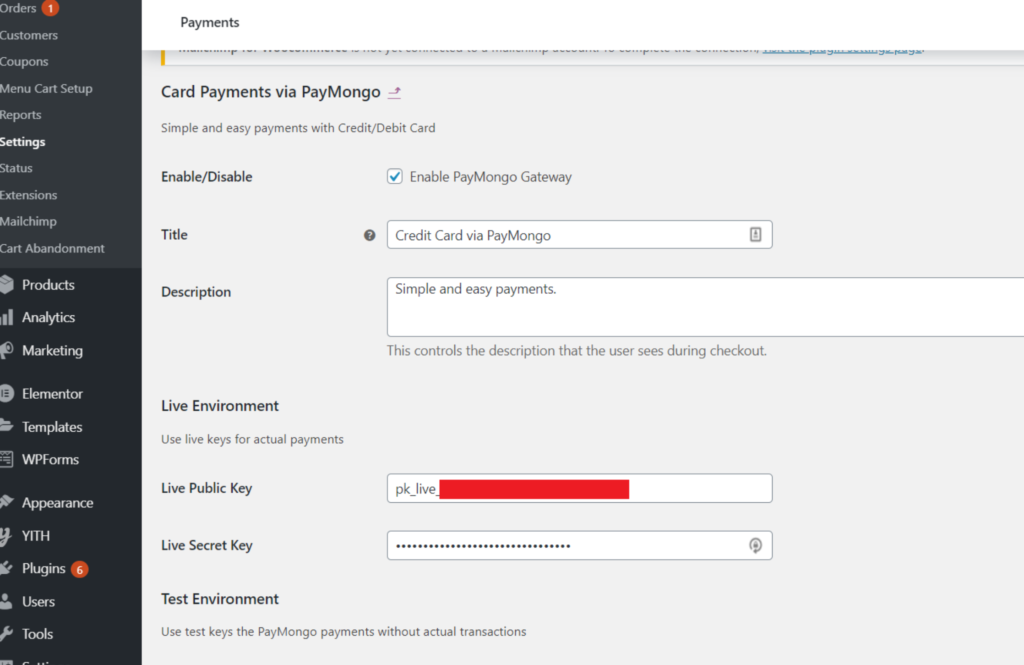
We are almost done with the setup. We just need to put the keys provided in our PayMongo account. In the payments tab, you can see the payment options available for your website. Some of them are provided by WooCommerce. In our case, choose the Card Payments via Paymongo and then click the Manage button on the right.

Get your Live Public Key and Live Secret Key in your PayMongo dashboard. It is located at the Developers tab.
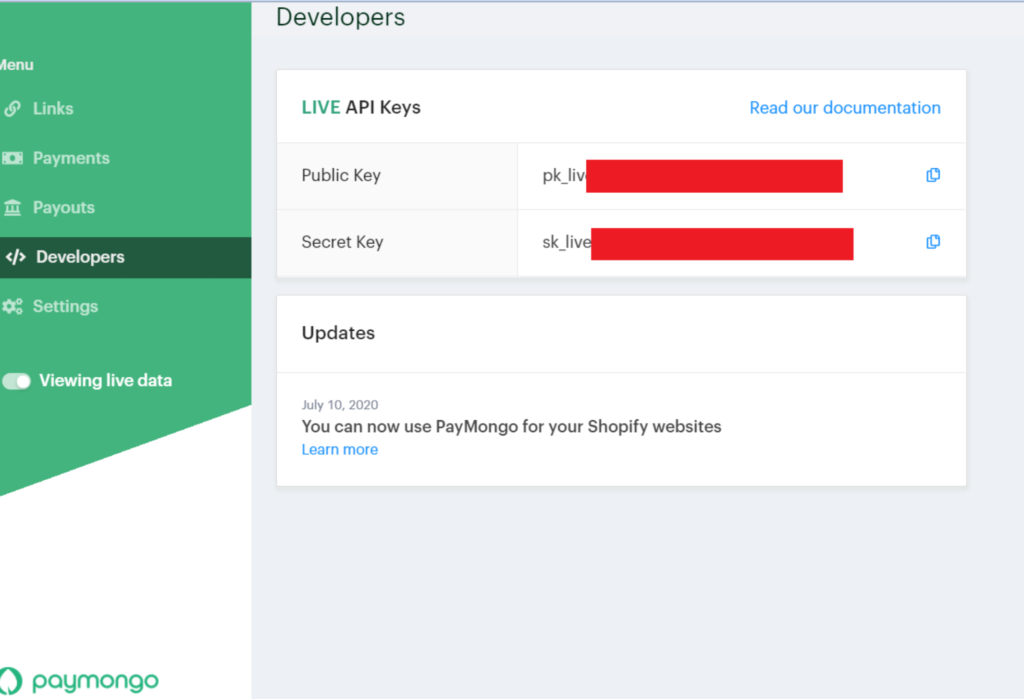
Copy the keys by clicking the copy icon or you can use Ctrl+C and then Ctrl+V to paste it in you WordPress dashboard. After pasting the keys click the blue Save Changes button.
5. Setup GCash Webhook Secret
Now for our final step, we need to setup the GCash webhook secret keys. Go back to Payments tab and this time, click the manage button on the right side of GCash Gateway via PayMongo. Look for the Webhook Secret section and click Click this to generate a webhook secret link to generate a webhook.
You will be redirected the a webhook generator tool that will look like this:

Paste the Secret Key that you have in your PayMongo dashboard > Developers > Secret Key and then click Generate Webhook orange button.
Copy the generated webhook that starts with these letters: whsk_ and then paste it back to the Webhook Secret section in your E-Commerce store and click the Save Changes button.

That’s it! The setup to add GCash as payment option for your E-Commerce store is done! Let’s check if it is really functioning. I tried it on one of my client’s E-Commerce store.

I filled out all the need customer information and chose GCash via Paymongo as the payment option. After clicking the place order button, it successfully redirected me to GCash payment portal!

Xendit Payment Gateway Step by Step Process to accept G-cash Payments
Applies to merchants in Indonesia and Philippines:
First step you have to do is ensure you are in Live Mode or you have been activated by submitting required documents in here.
- Go to your WordPress dashboard and go to Plugins tab and click on “Add New”.
- Type “WooCommerce – Xendit” on the search bar.
- Install the plugin.
- Go to “Installed Plugins”.
- Activate WooCommerce – Xendit plugin and click on Settings.
- Click on the “Connect to Xendit” button.
- Click on the “Allow” button. Make sure that you’ve already logged on your Xendit dashboard.
- Go back to your WooCommerce settings, click on the link to find your public API key from Xendit dashboard*.
- Copy the public API key.
- Paste it in your WooCommerce settings.
- Click “Save Changes”.
The decision to add GCash as a payment option for your E-Commerce store is very beneficial. It will surely increase your sales because some of your potential customers do not have debit cards or credit cards and there are times that you do not want to offer cash-on-delivery to certain areas (specially those very critical areas). So setting up GCash payment option is a great move for your store! If you ever need assistance or help in setting this up, don’t hesitate to contact me.